Image

Even if you’ve produced products at scale before, the cost associated with tooling often comes at a surprise (spoiler alert: it’s a huge investment). Let's review what you need to know about tooling for your product.
Tooling in manufacturing is a necessary phase for building your physical product.
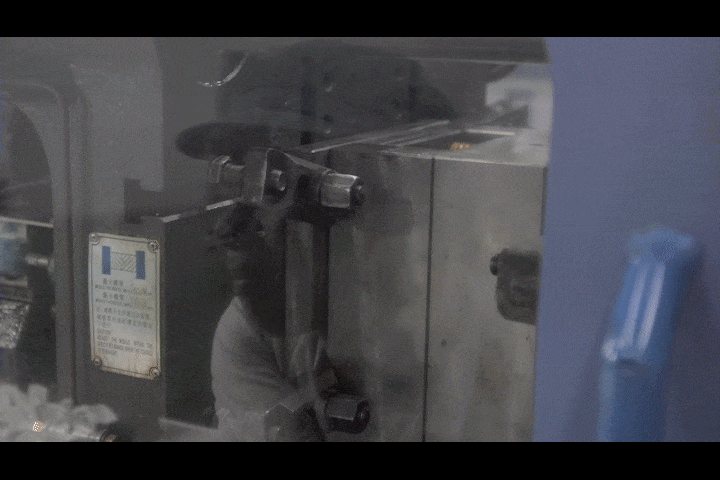
Tooling is essentially part manufacturing and can be completed in a variety of methods such as die casting, urethane casting, CNC machining, plastic injection molding, or 3D printing.
Whichever method you choose requires a unique knowledge of manufacturing best practices, manufacturing equipment, material limitations in the tool itself and the material that will be used in the tool.
Tooling is the process of designing and creating a mold (the tool) that creates the parts that make up your product.
These parts can range from being the exterior casing which houses internal components (PCB, batteries, sensors, etc.), to special pieces that have specific functions (like a heat sink), to accessories for your product.
Typically within electronic products, the housing is made of 2 parts made in either a plastic or metal material.
A plastic housing is created inside the mold that was made during tooling, known as plastic injection molding.
While a metal housing is cast inside a mold-tool, called pressure die casting.
In many of today’s IoT devices, plastic injection molding is the preferred method that tools are prepared for.
In addition to making the parts, the tool accounts for how the various pieces will fit together, any texture or imprint that is made into the material, the point of entry (injection gate) of the material into the final mold, and the draft angle to eject your parts cleanly from the mold.
In many of today’s IoT devices, plastic injection molding is the preferred method that tools are prepared for.
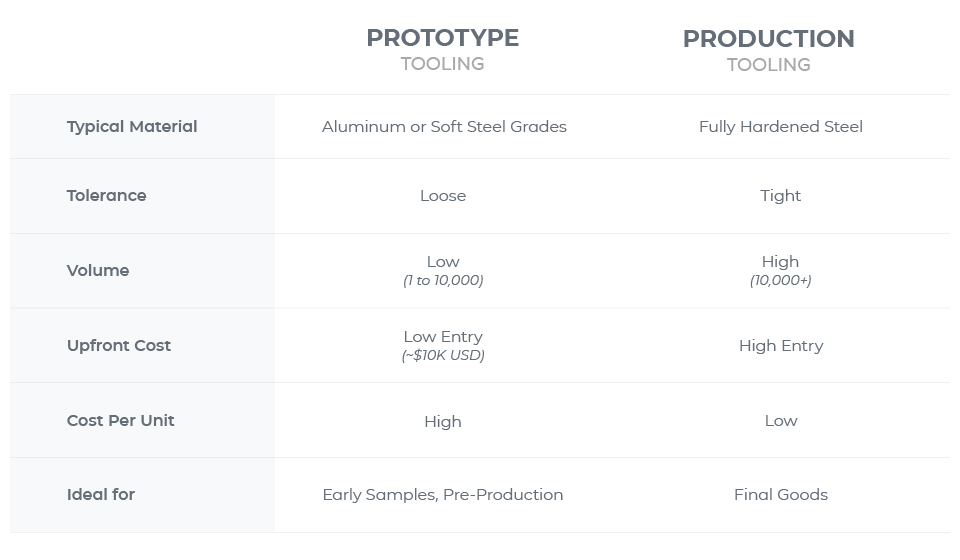
There are two types of tooling: tooling for prototypes and tooling for production (also known as tooling for manufacturing).
Tools created for prototyping are ideal for attaining the golden sample. Prototype tooling lends to more flexibility in making final adjustments to the product’s appearance. It also is useful in creating prototypes that can be used in pre-sales and marketing campaigns.
Prototype tooling is also known as rapid tooling or soft tooling. This type of tooling allows parts to be created fairly fast and inexpensively since the mold is machined from a soft material like aluminum, P20 tool steel, or NAK80 steel.
In addition, these tools are often made as inserts that are then assembled into a larger mold-base. This type of construction means that the rapid tools are typically then a single cavity mold.
Because of the materials and the assembly of these molds, rapid tooling does not allow for tight tolerances and often has a higher cost per unit.
When manufacturing for scale, your tool will need to be strong enough to withstand thousands to hundreds of thousands shots. Therefore, the tool mold is created out of a very strong material such as steel grade 718H.
A tool made for production will also be optimized to meet the capacity that you require. This means you will have a lower cost per unit over the lifetime of the tool but the upfront cost of the tool will be high.
You may be asking yourself, what’s the difference between prototype tooling and production tooling?
Depending on your goals and your product’s volume, one type of tooling may be a better fit for you at your current stage. It is not necessary to go through prototype tooling first in order to get to production tooling.
Once your product design is ready for tooling, you’ll receive a quote that breaks down your product’s tooling costs.
Your tooling quote will show at a minimum:
If you are new to developing a product or being involved in the tooling process, at the point that you receive your tooling quote, you may have some sticker shock and ask your manufacturer, “Why is tooling so expensive?”
There are a few reasons behind the expense of your product’s tooling.
Non-recurring engineering (NRE) costs is the cost associated with the preparation of your design files for tooling.
This coincides with your DFM phase where an engineer (who is well-versed in manufacturing best practices) will review your product’s design files.
Your design may be updated to ensure that it best fits the machining for your tool. In addition, updates may also be made so that the final assembly of your product is as efficient as possible.
The actual tool itself will need to be designed by a tooling professional, also known as the tool maker. This requires a unique set of knowledge dependent on the method of injection.
For plastic injection molding, items like tolerances, sink marks, and flow lines are taken into consideration as the tool is designed and machined.
In addition, one tool could create multiple parts (known as a multi-cavity mold). There are cost and timeline advantages to using a multi-cavity mold. When outputting multiple parts from one injection cycle, your capacity increases while decreasing your unit cost.
Typically multi-cavity molds create the same part. However, there is also an option for differing parts to be created from the same multi-cavity mold, known as a family tool.
A tooling expert knows the best layout and configuration for your mold design to help accomplish your goals.
Your tooling quote also includes the material costs to create your molds. It most likely will also include a markup to cover overhead costs as well.
Overhead costs are meant to cover the equipment that is used to create the tool and any wear and tear on the machine during the tool creation.
The NRE, tooling design, and material costs all must be covered before work is completed which requires an upfront payment.
A final item that is not included in your initial tooling quote is any revisions. Changes after tools are created will incur additional costs.
When investing so many dollars into creating your tools, you’d like it to last as long as possible. A tool’s lifespan, or lifecycle, is often measured in the expected number of parts it will create (also known as production cycle).
The two biggest factors that affect the lifespan is the tooling material and tonnage (or force) to create the molded parts.
The stronger the tool’s material correlates with a longer lifespan. For example, a higher grade metal like steel for your tool material will increase the tool’s lifespan.
The tonnage, or force, used to create your mold will also affect the tool’s lifespan. A higher force on an intricate, fragile section on a tool can wear down faster, and shorten its lifespan, compared to a higher force on a more robust section of the tool.
The two biggest factors that affect the lifespan of the tool is its material and the force needed to create the molded parts.
It’s important to know the expected length that your tool will last because it justifies the initial upfront cost.
Spread out the tooling cost to the expected production cycle and you’ll have a good sense of your tooling costs per unit produced.
At a bare minimum, products require 2 tools: one for the front of the product and one for the back.
The more intricate shape your product has typically means more individual parts are needed to make up your product. This increases the number of tools.
Additional tools will be needed for accessory parts, such as a box (or brackets) to hold the rechargeable battery or custom buttons that are not purchased through sourcing.
Check the fine print with your manufacturer’s agreement on the actual ownership of your tools. One might assume that since it’s related to your own product, that you own it. However, if a manufacturer puts in efforts to creating the tool, there’s the potential that they have rights to it.
Review your agreement on actual ownership of your product’s tools.
Even if you do have full ownership of the tool, it still will live at the manufacturing facility.
Your tool will remain there for the duration of production at that factory. In the event you change factories, it is possible to move your tool but there will likely be transfer fees associated.
Another item to keep in mind: if you ever need to halt production or you have a timeframe where no production is happening, there may be fees associated with storing and maintaining the tool.
Again, check the fine print to know ahead of time if this may be the case.
Your tooling timeline will be fully laid out to you by your manufacturing partner.
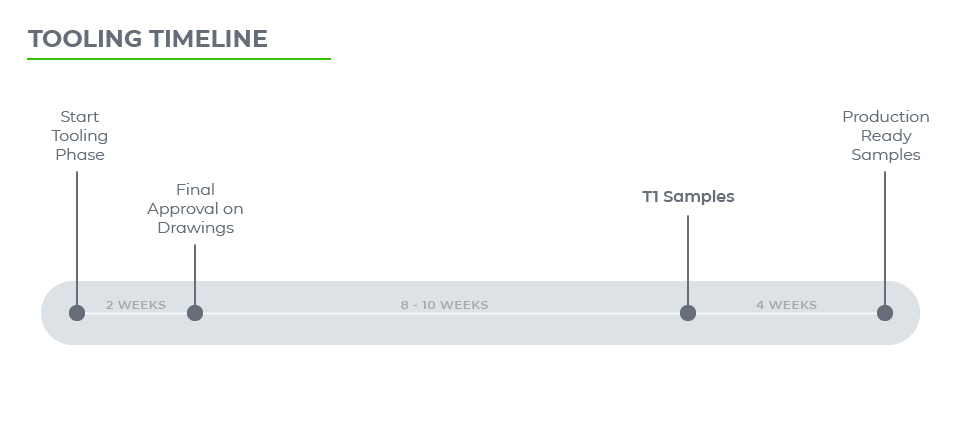
A typical timeline looks like:
All in, expect around 14 to 16 weeks to complete your product’s tooling phase to receive your production ready samples.
This phase is the preliminary phase to ensure your design and tooling files are finalized and approved.
Test or Trial Zero is the pre-sample sample. This ensures that the tooled mold behaves as expected. This sample usually does not have the final surface finish applied as the tool maker expects minor changes will be made.
As the customer, you would not receive this sample. It is only a part of the manufacturer’s process before they send you T1 samples.
Test or Trial #1 sample is the first sample run from the tooling that shows the injection molded part in its entirety including any surface finishes.
This is the phase for your team to confirm that the product meets all specifications, identify any issues, and make those final adjustments.
Test or Trial #2 sample, and any subsequent numbers, are additional sample runs after T1 that need further modifications to dial in your golden sample.
Tooling is a necessary phase of your product development journey. It’s also a huge investment in both time and money.
This phase sets up your manufacturing to be cost optimized and efficient while ensuring your product’s quality is produced at the highest level.
The tooling phase allows you to finalize any meticulous details with the physical look and feel of the product. Once your tooling sample is approved, your product is ready to move on to mass production.